Cart
0
You may also like


Discover how to apply, remove, and reuse your Opul Nails press-ons.

Thoroughly wash your hands, paying special attention to your nails. The goal is to remove any oils or residue to ensure you’re working on a clean, prepped nail surface.
Select the tips that best match the size of each of your nails. Gently press the tip onto your natural nail to check that the sides align perfectly with the edges of your nail bed.
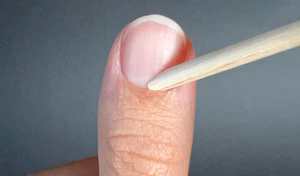
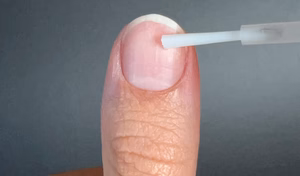
Using the flat end of the cuticle stick provided in your kit, gently push back your cuticles. The goal is to lift and move them away from the nail bed, especially if they’re slightly stuck to the nail surface.
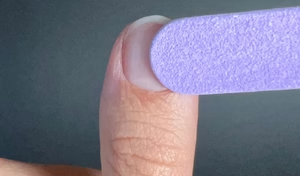
Using the mini nail file provided in your kit, gently buff the surface of your natural nails. The goal is to create a slightly rough texture to maximise adhesion.
Using the flat end of the cuticle stick provided in your kit, gently push back your cuticles. The goal is to lift and move them away from the nail bed, especially if they’re slightly stuck to the nail surface.
Using the mini nail file provided in your kit, gently buff the surface of your natural nails. The goal is to create a slightly rough texture to maximise adhesion.
Wipe each nail with an alcohol-soaked cotton pad or Nail Prep solution (not included in the kit) to remove any remaining oils. The goal is to create a perfectly dry and clean surface to ensure maximum adhesion.

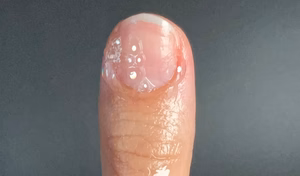
Using the brush applicator of your Brush-On Nail Glue, apply a generous amount of glue to the underside of the tip - the part that will go on your nail. Optional: for extra hold, apply a thin layer of glue to your natural nail as well.
Wipe each nail with an alcohol-soaked cotton pad or Nail Prep solution (not included in the kit) to remove any remaining oils. The goal is to create a perfectly dry and clean surface to ensure maximum adhesion.
Using the brush applicator of your Brush-On Nail Glue, apply a generous amount of glue to the underside of the tip - the part that will go on your nail. Optional: for extra hold, apply a thin layer of glue to your natural nail as well.

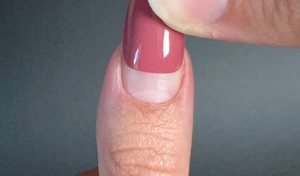
Slide the tip slightly under your cuticle, then press it down slowly from the base to the top of your nail. Once fully in place, hold it firmly to secure.

While the glue sets and the tip adheres properly, press and hold it for around 20 seconds, then gently release.
Slide the tip slightly under your cuticle, then press it down slowly from the base to the top of your nail. Once fully in place, hold it firmly to secure.
While the glue sets and the tip adheres properly, press and hold it for around 20 seconds, then gently release.
One of the main reasons press-ons lift prematurely is poor natural nail prep. Follow these tips to make sure your nails last beautifully:


Fill a bowl with warm water (bath temperature), a drop of soap, and a bit of sunflower oil. Let your hands soak for 10-15 minutes.

Carefully insert the flat side of the wooden stick under one edge of the SoftGel tip and begin to loosen it slowly. Repeat on the other side.To avoid damaging your natural nails, take your time and be as gentle as possible.If the tip feels too resistant, apply a little more cuticle oil and try again after a few moments.
Fill a bowl with warm water (bath temperature), a drop of soap, and a bit of sunflower oil. Let your hands soak for 10-15 minutes.
Carefully insert the flat side of the wooden stick under one edge of the SoftGel tip and begin to loosen it slowly. Repeat on the other side.To avoid damaging your natural nails, take your time and be as gentle as possible.If the tip feels too resistant, apply a little more cuticle oil and try again after a few moments.

Using the mini nail file, gently buff off any dried glue residue from your natural nails. These areas are easy to spot, as they appear smoother and shinier than your natural nail surface.

Still using the mini nail file - which you can cut in half lengthwise if needed - gently buff away any dried glue left under the tips to make them reusable.
Using the mini nail file, gently buff off any dried glue residue from your natural nails. These areas are easy to spot, as they appear smoother and shinier than your natural nail surface.
Still using the mini nail file - which you can cut in half lengthwise if needed - gently buff away any dried glue left under the tips to make them reusable.

To smooth the surface and remove any remaining adhesive, gently run a cotton bud soaked in remover under the nails where glue residue remains. The acetone in the remover will help dissolve any leftover traces.

and that’s it, your press-ons are ready to be reused next time!
To smooth the surface and remove any remaining adhesive, gently run a cotton bud soaked in remover under the nails where glue residue remains. The acetone in the remover will help dissolve any leftover traces.
and that’s it, your press-ons are ready to be reused next time!

Customer Support 6 Days a Week
Our dedicated customer service team is here to help

No Stress
You have 30 days to change your mind

Vegan & Cruelty-Free
Beauty products that are kind to animals

